In this blog post, you will learn how to use the export decorator and the import statement. The export decorator and import statement will reduce duplication and improve the reusability of user-defined types, variables, and user-defined functions in Azure Bicep.
Note! To use export and import you need Azure Bicep version 0.25.3 or newer.
What is it?
One shortcoming of Azure Bicep is the inability to reuse user-defined types or variables across multiple Bicep files. However, the introduction of compile-time imports helps to overcome this limitation. This improvement introduces a new decorator, export(), and a new statement, import.
Exporting
The @export() decorator is used to indicate that a type, variable, or function (currently in preview) is being able to be imported by another bicep file. When applied, the @export() decorator makes the marked values importable and reusable across multiple Bicep files.
To note, when exporting variables it must be a compile-time constant. This means that the value must be determined and fixed before the compilation of the Bicep.
In the above Bicep example (referred to as shared.bicep), you can see two different exports. Two values are defined: varRegion, which holds the string value ‘we’, and ‘tagsType’, which is a user-defined type.
The variable and user-defined type are decorated with the @export() decorator. This means that these two exports are ready to be imported into other Bicep files. This1. can be done with the import statement. Let’s have a look at the import statement.
Importing
The import statement is used to import values marked by the @export() decorator. The import can be used in either a Bicep file or a Bicepparam file.
Importing is straightforward, but there are three ways to do so:
1. Import by name
| import { region, tagsType } from 'shared.bicep' |
In the example above, you see the import of the region variable and the tagsType type from the Bicep file shared.bicep. This can be used to selectively import variables, user-defined types or functions into a Bicep file or a Bicepparam file.
This is how it works in a Bicep file:
| import { region, tagsType } from 'shared.bicep' | |
| output outRegion string = region | |
| output outTags tagsType = { | |
| Environment: 'Dev' | |
| CostCenter: '12345' | |
| BusinessUnit: 'IT' | |
| Owner: 'John Lokerse' | |
| } |
2. Import by name and add an alias
| import { region as importedRegion } from 'shared.bicep' |
In the example above, the region variable is imported under the alias importedRegion. The alias importedRegion can now be used to refer to the exported region.
In the snippet below, you can see an import statement in a Bicepparam file. This statement imports the variable region under the alias importRegion. The importRegion value is then used in the parKeyVaultName parameter:
| using 'keyVault.bicep' | |
| import { region as importRegion } from 'shared.bicep' | |
| param parKeyVaultName = 'kv-${importRegion}-${uniqueString(importRegion)}' |
3. Import everything using a wildcard
| import * as shared from 'shared.bicep' |
In the example above, a wildcard import is used and an alias named shared is assigned. This alias serves as the “accessor name” for the exported items in shared.bicep, and the “.” (dot) is used to refer to the exported item. Autocompletion is supported.
The use of the wildcard signifies that all items marked with the export() decorator are being imported into the Bicep file.
In the Bicep example below, you can see the import statement using a wildcard, the assigned alias, and how to refer to the exported item:

In Action
In the above explanation of import and export(), you have seen snippets demonstrating how to use this functionality. Let’s combine these snippets into a scenario. In the following example, you will see three Bicep files:
shared.bicep, which holds the values to be exportedkeyVault.bicep, which imports values fromshared.bicepkeyVault.bicepparam, which also imports values fromshared.bicep
Shared.bicep
In shared.bicep you see the region variable and tagsType user-defined type. These are decorated with the @export() decorator so these are ready to be imported into another Bicep file.
An advantage of exporting tagsType is that it enforces the use of the tags Environment, CostCenter, Owner, and BusinessUnit. The property *: string allows for the addition of other optional tags. Also, by adding tags in one location, all other Bicep files that import tagsType will be automatically updated.
Importing in Bicep file and Bicepparam file
The shared.bicep file has been created, and you can now export these values using the import statement. In the Bicep example below, you will see the import statement. Only the tagsType has been imported from shared.bicep and has been assigned to the parTags parameter.
| import { tagsType } from './shared.bicep' | |
| param parKeyVaultName string | |
| param parTags tagsType | |
| resource resKeyVault 'Microsoft.KeyVault/vaults@2023-07-01' = { | |
| name: parKeyVaultName | |
| tags: parTags | |
| location: resourceGroup().location | |
| properties: { | |
| sku: { | |
| name: 'standard' | |
| family: 'A' | |
| } | |
| tenantId: tenant().tenantId | |
| accessPolicies: [] | |
| } | |
| } |
In addition to importing in a Bicep file, we also perform an import in the Bicepparam file. This import statement brings in the region variable under the alias importRegion, which can then be used to refer to the imported region variable within the Bicepparam file:
| using 'keyVault.bicep' | |
| import { region as importRegion } from 'shared.bicep' | |
| param parKeyVaultName = 'kv-${importRegion}-${uniqueString(importRegion)}' | |
| param parTags = { | |
| Environment: 'Prod' | |
| CostCenter: '12345' | |
| Owner: 'John Lokerse' | |
| BusinessUnit: 'IT' | |
| } |
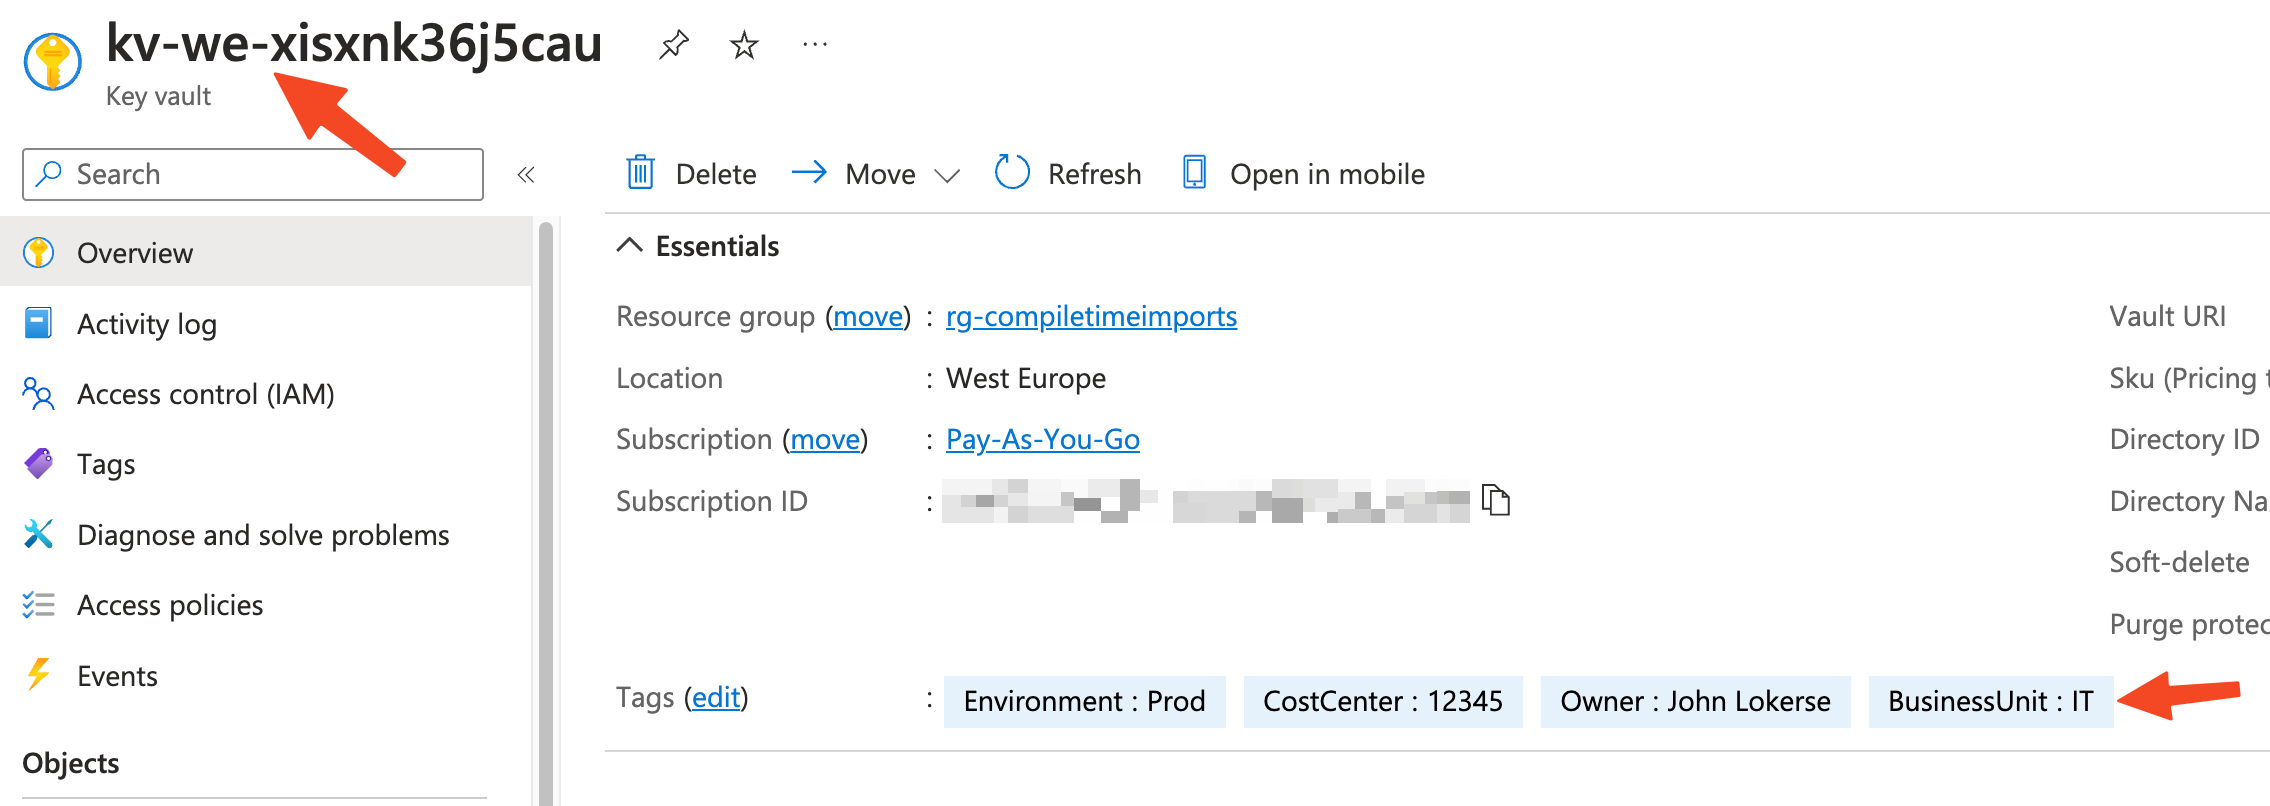
Deployment output
After deploying the keyVault.bicep file, you will notice that the importRegion variable is interpolated with the name of the Key Vault. Additionally, the tags, which are required by a user-defined type, are set.
Behind the scenes
When you transpile the Bicep template into an ARM template (JSON), you will notice that the definition property is added to the ARM template. Transpilation is a process that involves converting one language (Bicep) into an equivalent version of the same language (ARM).
During transpilation, it appears that the imported user-defined type tagsType is injected into the ARM template. An additional metadata property, __bicep_imported_from!, is added, which contains the sourceTemplate of the imported type. Let’s take a look at the ARM template:
| { | |
| "$schema": "https://schema.management.azure.com/schemas/2019-04-01/deploymentTemplate.json#", | |
| "languageVersion": "2.0", | |
| "contentVersion": "1.0.0.0", | |
| "definitions": { | |
| "tagsType": { | |
| "type": "object", | |
| "properties": { | |
| "Environment": { | |
| "type": "string", | |
| "allowedValues": [ | |
| "Dev", | |
| "Prod", | |
| "QA", | |
| "Stage", | |
| "Test" | |
| ] | |
| }, | |
| "CostCenter": { | |
| "type": "string" | |
| }, | |
| "Owner": { | |
| "type": "string" | |
| }, | |
| "BusinessUnit": { | |
| "type": "string" | |
| } | |
| }, | |
| "additionalProperties": { | |
| "type": "string" | |
| }, | |
| "metadata": { | |
| "__bicep_imported_from!": { | |
| "sourceTemplate": "shared.bicep" | |
| } | |
| } | |
| } | |
| }, | |
| "parameters": { | |
| "parKeyVaultName": { | |
| "type": "string" | |
| }, | |
| "parTags": { | |
| "$ref": "#/definitions/tagsType" | |
| } | |
| }, | |
| "resources": { | |
| ... resources here ... | |
| } | |
| } |
Conclusion
With the use of compile-time imports, you can reduce duplication in your Bicep code and enhance its reusability. This feature is easily accessible via the export() decorator and the import statement. There are numerous use cases for compile-time imports. For example, you can implement imports and exports based on a naming convention for your resources.
